Depending on how many cards you want to make will determine how many pieces you will cut out. I did 18 playing cards for our memory game~so you will need to do 2 of each image [9 images from our clear rubber stamps circus sets].
 Cut out [18] pieces of pattern paper size 3" x 4", [18] pieces of white card stock or thin cardboard size 2-1/2" x 3-1/2". Glue or use double sided sticky tape and put the print and white card stock together (as shown in the photo below). You will put the white card stock on the backside of the printed paper. If you have double sided printed paper then choose what side you want on front and you will then be covering the other side. [Excuse my fuzzy edges on my paper~I need a new blade for my cutter and they were out of them at the store :)]
 Cut out the corners on all 4 sides as shown. Then use glue or double sided sticky tape and glue the short side down (as shown in the middle sample), and then do the same to the long side. Finished card should look like the sample on the right.
 Cut out [18] coordinating colors in card stock size 2-1/4" x 3-1/4". You can use white and not have another piece of card stock and then complete your project, but in this example I used a colored card stock to go with my printed paper. I wanted to make a heavier playing card, as little hands will be playing with them. Glue or double sided sticky tape the color card stock onto the backside [white] of your printed piece. See photo for example. You do not have to do one color, you can do several colors as I did below.
 Cut out [18] pieces of white card stock in size 2" x 3". Stamp your image 2 times on to the white card stock paper and color them in.
 Glue or double sided sticky tape your finished card to the colored card stock. Your end result will have one side with the image and the other side with your print. Now you can play memory or go fish. I took it one step further as I wanted to give the cards a "matte" finish.
 Put 2 coats of Mod Podge onto the cards, but I have to warn you that if you use child safe/washable ink, it may bleed a little. You may want to use a permanent ink stamp pad and if working with children the adult do the stamping. I did use permanent markers to color in my images, and then I did not have to worry about bleeding when I used the Mod Podge. You do not have to do this step, but I wanted to have the extra glue to keep it together and matte finish. If you are going to use the Mod Podge, then do this at night when the kids are in bed. The Mod Podge does dry clear.
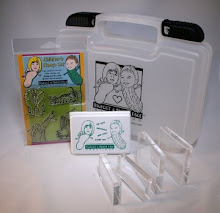
 The cute stamps in this project came from our Bigfoot & Pickle Face Creations Collection~Circus Act! I did use permanent colored markers to color in the images and stamped the images with our child safe/washable ink stamp pad in black. I used double sided sticky tape, washable glue and glue stick to put all the pieces together. It took some time and work but it was lots of fun.
So start stamping today and make a set of playing cards with your kids or make and give as a gift. As always, you are welcome to visit our website for more information about us and to purchase these great products that are made in the USA, visit our storefront! Never stop having fun and thank you for visiting us. Leave us a comment or follow us, we love it.
Visit us tomorrow, as I will make something to hold the cards. Better yet, subscribe to our feed or subscribe via email so you will be notified when I add things to my blog.


Very cute! Loved that you used Mod Podge :D
ReplyDeleteMod Podge held it all together and gave it a great finished look. Thanks for commenting!
ReplyDelete