Monday, October 18, 2010

Acorn Necklaces

Saw a cute acorn necklace in the Family Fun magazine and thought it would be a wonderful project to do with the Daisy Scouts. So this weekend we went up-north to find acorns and there were hardly any to be found under the fallen leaves; I think the squirrels got to them. So when we got back yesterday, we went to the local park and found a wonderful stash for our Daisy Scout meeting tomorrow.

Bigfoot & Pickle Face had a wonderful time running around in the woods and finding all sorts of treasures.

Here is our single acorn necklace.


Here is our twin acorn necklace.


Bigfoot & Pickle Face together with a friend.

Pickle Face enjoying the weather and running around.


We have been busy lately, but enjoying the fall weather. Take time to spend with the kids doing fun crafts and creating. Thank you for following!

Friday, September 10, 2010

Back to School for Bigfoot September 2010

Like everyone else, Bigfoot started school in September. She is now in full day Kindergarten and loving it. Here are some pictures of her before school and her taking the bus home.

Pickle Face wanted his hair like his sister, hence the hair bands and he had to have a backpack like hers. He went to school with us and everyone thought his hair was a "hoot". It did not last long and the hair bands came out.

Here they are together posing for the picture.

Bigfoot posing by herself.


Pickle Face and his trademark smile, usually one eye closed.


We dropped Bigfoot off at school which is less the a mile away. She insisted on riding the bus so she takes it home. This is the first time riding the bus home, she loves it!


Hard to believe that she was a tiny baby 5 years ago!

Have fun and enjoy crafting with the little ones as it brings out the child in you.

Friday, August 27, 2010

Biking with Bigfoot

Bigfoot is now officially off of training wheels. She is so proud riding her new "banana seat" bike. Although it is used it is new to her and she does not say anything about the 2 different wheels and the rust on the bike and peddles. The little handle on the back of the bike seat makes it nice to hold the bike up without breaking your back while you are running along side until they learn how to balance on their own. I tried training her with her much smaller bike at the early part of summer and just about broke my back trying to hold her up so I put the training wheels back on.


Here are some photos to enjoy.


She is proud of her seat and is showing mom the cut in the material where she fell.


Showing me her battle wounds, scratches and dings.


Oops, steered on to the lawn.


Riding on her own, whee.


The joy on her face says it all, "I am free". Dad is running beside her to catch her if she falls.


Now she just needs to learn how to stop and get off the bike without tipping over. She moved back to her smaller bike, which makes her look like a big clown on a little bike like you see at the circus, and she is doing great. Soon she will go back to her bigger bike once she gains courage and confidence and the strength to hold it up.

Hope you had a wonderful summer with much learning and crafting.

Paper

It has been quite a while since I have posted anything, so I had to tell you about this great deal I got on paper from Scenic Route Paper Company. I love paper and I received my paper today and boy was it nice and many of the pages were double sided. I purchased 100 sheets of paper for $12.00 and the paper is nice and durable.


I subscribe to their email notifications and when I saw the sale I could not pass it up. Look at the wonderful colors and the cute robot paper in the bottom left corner! I will now have to put together a project with my new paper and post it. Time for some fun!


Thanks for being patient with me, summer gets so busy and most of the time is spent outside. Bigfoot and Pickle Face have been getting into the stamps and tattoo markers, I just don't have pictures of them.

Enjoy your weekend and happy stamping and crafting.

Wednesday, June 16, 2010

Finger Print Cards with Washable Ink Pads

In the prior post you saw pictures from Bigfoot's Tie Dye Birthday Party that was lots of fun.

Of course we are doing homemade Thank You cards, so I gave her some suggestions for finger printing the cards. I wrote the word "Thank You" for her to copy on each card and then had her decorate the white card stock any way she liked and then she glued it to the front of the blue card. The only thing I did was cut out the paper for her.

She wrote her name on the inside of the card and I will finish it by writing a personalized note.


Bigfoot is fascinated with the word "toot", so she had to write it on the front of each card. We used the child safe washable ink stamp pads from our collection to make the finger prints and then she used washable markers for making faces and design work.

It was bath night so the dye from the ink pad washed off in the bath. Since she was using several colors on her same finger, it probably would have taken several washings for the ink to come off if it was not bath night.

Try this project with your children and make bookmarks and your own homemade cards.

You can visit Bigfoot and Pickle Face's storefront to purchase the washable ink pads. Have fun stamping and crafting with your kids.

Bigfoot's Birthday Party - Tie Dye

Bigfoot is turning 5 in June. Hard to believe, as it seems like she was born just yesterday. I put together her first 2 1/2 years of her life into a photo book ordered here at Winkflash.com for $19.95 plus shipping, what a deal.

Bigfoot's birthday party theme was tie dying and we sure had fun. Since I was running the party, it was so hard to get pictures but here is one of the birthday girl and then her and a friend actually coloring a shirt.

Bigfoot

Coloring shirts ~ lucky she had her shirt on backwards to the dye got on the back as it is a new shirts. I informed the parents to send the kids in old clothes and here Bigfoot wore a new shirt. I was so busy I did not notice.


Here is Bigfoot with her shirt complete. She is holding her doll "Bryce" who has on a tie dye outfit that Bigfoot had as a baby.

I got my supplies for the tee shirts at Shirt Suppliers, make sure it is 100% cotton if using for tie dye. The supplies were ordered from Dharma Trading Company, and I purchased the kit for 50 so I can have extra for other projects later on.

Make sure you prepare in advance so it moves smoothly. I wrapped all the shirts in advance so we had time for other fun things.

Thanks for stopping by and have a great week.

Wednesday, May 26, 2010

Teacher Appreciation Day door decoration

Teacher's appreciation week for our school was during the week of May 17th, so as Room Mom I took on the task of decorating the door for the teachers. Bigfoot has some wonderful teachers and what better way to thank them with a classy looking door.

This project took quite a bit of preparation but the teachers really liked the way it turned out so it made it worth the time. I took 2 pictures of each of the kids, one a smiling face and then they made a silly face. On the butterfly I used the smiling face and the flowers were silly faces. The kids had a field trip to the farm that Monday morning, so I took 30 minutes and decorated the door while they were gone. I used glue dots to put up the flower and butterflies so they could be re-used or removed later without any destruction. The next morning when I stopped by the classroom the glue dots did not hold and the majority of my butterflies came down ~ quite disappointing. The glue dots were still sticky but apparently does not get a good hold on card stock paper even though they are considered medium hold. I used tape and put them back up and since then they have not tried to escape.


Here is the full door.


Here is a close up of part of the door.


I unfortunately did not take a picture of the homemade appreciation cards that were made, but they were cute and each kid signed it for the teachers. I also made a paper flower with their picture on one side and a Hershey Kiss on the other side to give to the teacher, they did get to eat the Hershey Kiss later on.

Last project is the end of the year gift which I have completed, yeah! Just need to make the card and I am done for the year. Thanks for visiting!

Wednesday

It has been quite a while since the blog has been updated. Many personal and business things have been keeping me quite busy, so as a result not much updating. Weather has been really nice and here are some pictures of how we spent Mother's Day ~ at the zoo. Bigfoot and Pickle Face had a wonderful time and I have to say it was the best Mom's Day so far.

[Pictures are not the best but you can see the joy on their face~or is that confusion and concentration.]

Bigfoot and her horse.

Pickle Face on his horse.


Have a wonderful day and thanks for following me.

Monday, March 29, 2010

Award Craft Project

Bigfoot has been waking in the night to have us cover her up. So about 2 weeks ago, I told her that if she slept through the night consistently and covered herself up and did not wake us up, she would get an award at the end of the week. Well it turned into a competition with Pickle Face. Everyday she wants to know if he slept through the night. So we started to tally it on the calender and I had to extend the competition another week because she had more points them him ~ she woke us up more.

So I combined two easy projects together and created this award. Depending on who sleeps through the night without interruption, they get to sit up on the higher block. Bigfoot was on the lower block but it was bothering her and she wanted to move to the taller one, so I accommodated her as she did sleep through the night the day prior. She said Pickle Face could sit on her lap.


How Does She? is where I got the idea for the wood blocks. I took some short cuts and wanted to sand some more and stain the exposed wood, but ran out of time. I can do it later if it bothers me. How Does She? has some wonderful ideas and fun things, go visit their site HERE. I did not have 2x4 so I used what I had in my garage.

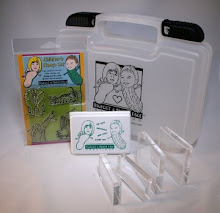
For the instructions on how to make the "figures" see Claudine Hellmuth's site HERE. I watched the Martha Stewart episode and it was very helpful. I did not have the glue that was listed so I used E6000 and it worked. I printed the pictures in black and white to my laser printer and did not use the copier. Bigfoot is not a big dress wearer, so I put pants on her. Claudine has some fun ideas on her blog which is HERE.

Have fun and don't forget to work on your rubber stamping projects. Great way to make Easter cards. ~ Cheryl

Giveaway on My Family My Forever - Ends March 29

Normally I have crafty projects on my site but I could not pass up announcing My Family My Forever is having a wonderful giveaway for My Silly Body Book. Hurry, it ends today March 29th. Click on this link to get to the giveaway http://myfamilymyforever.com/?p=468&cpage=2#comment-755 .

Have a wonderful day and enjoy the warm weather. Cheryl

Thursday, March 11, 2010

New Color Child safe/Washable Ink Pad ~ Orange

I have added the color orange to our child safe/washable ink stamp pads. This is a very fun color to use and the kids will love it. You can purchase the ink pad along with our other products at Bigfoot & Pickle Face store front HERE.


Used our turkey stamp from our Farm Friends Set 1 to you show what it looks like, how fun!


Have a great day and happy stamping and crafting with your children.

Tuesday, March 9, 2010

Bookmarks ~ Starter Kit Images

Here are some bookmarks I made to attach to some rubber stamp starter kits I donated to the school where they are putting together "A Birthday Party in a Bag" for needy children. The birthday bags will be given to the local Food Pantry and will contain everything needed to give a child a memorable birthday party. I receive many requests for donations and it is hard to donate to places out of state as it could get costly to ship the product; so I donate to local places and hopefully I can make a difference.


Each bookmark displays the images of the stamps that are included in the Bigfoot & Picke Face clear rubber stamp starter kits. I then colored them and for a little extra sparkle added some Stickles™ Glitter Glue to the images to make the "pop". Stickles so fun to use and even though it comes in a small bottle it goes a long way.

Have a fabulous day and donate to assist those that are not as fortunate.

Wednesday, March 3, 2010

Bigfoot & Pickle Face ~ Relaxing

Very lovely days we are having lately, spring will be here soon. Yesterday the kids spent some time outside in the late afternoon and while we were at the neighborhood park we found a birds nest that was on the ground. Bigfoot just had to have it and as it is so cold I am sure there is no bird living it in now, so we took it home. She decided to put it in one of the bushes and constantly looks out the window to see if a bird has moved in. No such luck yet. It blends in with the bush, but if you look real close you can see it.

The two kids played in the snow and then decided to take some time to relax and watch the sun go down. Here they are sitting in the chairs I forgot to bring in before the snowfall. Just their size.


Enjoy your day and take time to relax.

Pop Up Card - Tutorial

Here are the instructions on how to make a simple pop-up card. Modify the design to fit the theme of the card you want to give. This card was designed for an invite. Here is a side view of the card, so when it opens the object that is on the inside of the card stands out. You could put picture of your child or design a present or cupcake as the item to pop-out if your are making a birthday card. Once you make the basics of the card, then put on your creative hat and have your child join in the fun of decorating.

Side view:

Front view:

Inside of the card [hard to see that the cow is standing out~he does look cool in person]:

First I cut most of the pieces that I needed to decorate my card. Main card [outside] cut out of card stock at 3-1/2" x 8". On the 8" side score at 4" [or fold the card in half]. Inside of the card, cut a piece of coordinating card stock at 3-1/4" x 7-3/4" and fold in half on the 7 3/4" side.

Front pieces of the card I cut 1 piece of card stock 1-1/4" x 3-1/2" and another piece at 1" x 3-1/2". Inside pieces of the card I printed out my sayings on the computer and then cut around the words. I stamped with our clear rubber stamps the cow using our child safe/washable ink pad in black. I made a birthday hat to place on his head.


Take the inside piece of card stock [3-1/4" x 7-3/4"] and after you fold it in half, make 2 slits in the middle of the card spacing them about 1/2" to 3/4" apart. See below example. Fold the tab forward and then back.


Push the tab through to the other side so it makes a little stair step. Since I had double sided card stock I could have used either side depending on what design I wanted to show.

Glue or use double sided sticky tape attach the "inside" of the card to the "outside" of the card. Glue around the "stair step" so that it does not stick down on to the outside layer of the card.


Now it is time to decorate your card and have fun. Make sure you include the children on all your kids crafting projects. Have a wonderful day!

Monday, March 1, 2010

Swing/Flip Homemade Card

This card cool because it is different and very fun to give away. Think outside the box when decorating it and always include the kids. An adult should cut out the card because it is a bit tricky, but the kids can do the designing and add their own twist.

Here is the front of the card.

Here is the back of the card when it flips. I used white card stock for a message to be written and layered it on top of coordinating card stock.


To do the outside card, first cut a piece of card stock at 6" x 5 1/2". On the 6" side score at 2 1/2" and 3 1/2". See below image as a guideline. Cut inside the card creating a 1" frame and stopping at the score line. Usually rulers are 1" in width so you can use that as a guide and cut along the ruler with an exacto knife if you have no other option [just make sure you stop at the score lines]. Fold the card like a "z" along the scored lines. When you open and close the card it should move easily.


Cut 2 pieces of card stock 3 1/2" x 4" and glue to the inside panel. This will cover up your score lines. When you decorate this card, be aware that the front of the card will be smaller then when you have the card fully opened [when you flip it]. So decorate it in the folded or closed position, otherwise you may lose some of your design behind a frame.


Time to add your own design. Here is the card from the top view. Use this as an invitation to a party, the recipient will have lots of fun flipping the card to view all the details.


Start having fun with your children doing kids' crafts and you will be impressed with the outcome. Is there a thank you card you need to send or a get well card, why buy one when you can make your own.

I used the clear stamp from our fish set 2 and our very popular child safe/washable ink stamp pad in black from our Bigfoot & Pickle Face collection. Thanks for stopping by and when you are trapped in by snow, rain and sickness and the kids are climbing the wall, pull out the stamps and let the creativity flow.

Friday, February 26, 2010

Triangle Treat Box - Homemade

Once again, this item is great as a party favor for a birthday, bridal shower, baby shower or for a holiday gathering. Very easy and quick to make and a wonderful project for the kids to assist with decorating. It took me about 5 minutes to put this together.

Take a 8 1/2" x 11" piece of card stock and on the 8 1/2" side score or fold at 3 1/2", 7" and 10 1/2". Turn to the 11" side and score at 3". Cut as shown below up to the score line and cut off the small end piece. Fold and glue the box together on the side.

Fold 2 of the flaps back and up and hold and take a pencil and trace the triangle onto the piece of card stock. Do this with all 3 sides. See below for example.

Cut along the triangle and cut on the inside of the triangle. Glue the flaps down.

Decorate and then put your treats in a bag and you are done. If you would like to have a top border, the paper size is 1" x 11". The font that I used is from the following website ~ freefontfun.com. You will find many cool fonts and it is very easy to download.


The elephant is from Bigfoot & Pickle Face clear rubber stamp set and I designed a hat for him to dress him up for a party. Go to our storefront if you would like to purchase the stamp set; don't forget to buy a child safe/washable ink stamp pad. Have fun and have a great weekend creating kids crafts!

Monday, February 8, 2010

Valentine Folded Heart Card

I love this idea of a Valentine's Day card. Very simple and easy to make, and it does not have to be perfect so your kids can help you with this project. Since Patti at "Creations by Patti" blog has a wonderful tutorial on how to do this project, you can click HERE.

This is my card following her instructions. I did modify and used a ribbon to go around the card and stuck my flower to the ribbon. I did cheat and glued my inside card on the heart and then scored around around the card; I was off a just bit, but the ribbon and flower hide my mistake :). I did use tissue paper for the flower [it was pretty wrinkled] and it worked better if I folded the tissue paper in half and then used the punch. I then put the flower together with a pink brad and dipped and rubbed it on out Bigfoot & Pickle Face child safe/washable ink pad in the color pink.

Card Folded

Inside of the card.


I found this stamp at the local craft store at 1/2 off the clearance so I paid $1.88 [original $7.50]. The stamp is by Great Impressions and I really like it because it reminds me of Bigfoot & Pickle Face when they are playing nice.


Here is Bigfoot showing off her barrettes.

Happy stamping and creative crafting with the kids.