Wednesday, June 24, 2009

Homemade Card with Clear Rubber Stamp Fish

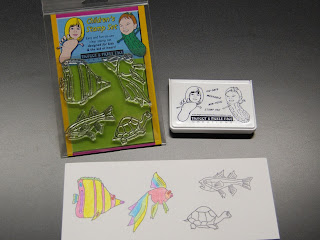
Here is another fun and simple card to make. We are using this format for a thank you card, but you can use it for any occasion. We used a clear rubber stamp to decorate this card from the Bigfoot & Pickle Face Fish series.

First cut out of card stock one 4" x 9-1/2". You should be able to get 2 cards out of one 8-1/2" x 11" paper. Remember to keep your scraps as you will use them eventually.

Score the card at 5-1/2". You can fold and use the card many ways depending on the design you want to end up with.

Cut one 4" x 4" and a coordinating strip of 2" x 4" [which I used from left over paper]. You can cut these strips to the size and look you want to achieve.

Decorate the card to your liking. Here I layered the 4" x 4" paper on my card and then placed the 2" x 4" strip on top of that. You do not need to use card stock as you may find a decorative paper you want to use that is not card stock.

I stamped from our Bigfoot & Pickle Face Creations line the clear rubber stamp fish from SKU#FSH05. I put a "Thank you for the gift" message on the card. We used our child safe/washable ink pad in green and colored the image with washable markers. On the outside of the fish we just dabbed it with the washable blue and pink ink pads. Remember, use your imagination and you will be amazed at what you will design.

Cut a 3-3/4" x 3-3/4" white square to place on the inside of the card for your message.


Happy stamping and have fun doing kids crafts with your children! Don't forget to visit our website or storefront to purchase our products.

Stair Step Card

Here is a real easy card to make with your children. It is fun and simple and you don't need much skill, and the end result will make you look like you have been doing these cards professionally for years. My cards are thank you cards as we just recently had a birthday party and need to send out some thank you cards; but these cards can be used for any occasion.

Cut your paper [card stock]. I have a paper trimmer that you can change the blade out to use as a scorer. It cost me $9.99 at the local craft store. You will use the paper cutter/scorer a lot if you intend on following my blog ~ so you will get your money's worth out of purchasing this type of item if don't have one already.

Your main card size is 10-1/2" x 4-1/4"; you should get 2 out of 1 piece of paper [use card stock]. If you want to make the card wider, then adjust the 4 1/4" to your chosen size. So cut your paper to 10-1/2" x 4-1/4" [keep the 4" x 1" strip].

Score in the landscape position at 1-1/4", 2-1/2", 4-1/4", 6" and 8-1/4". Fold your paper like a stair step starting at the 1-1/4" score line ~ see photo.

Next cut the paper for your stair steps. I used scrap paper from prior projects and the left over piece from this project. You will need the following sizes for your steps: 4" x 2", 4" x 1-1/2" and 4" x 1". You can use any type of paper and it does not need to be card stock.

Next step is the fun part, decorating. Glue or use double sided tape on the pieces you cut for the "steps" and place them on your card. I printed out on the computer a note for the first step that said "Thank You for the Gift". This could be any message you want to say. You can also use stamps that have a saying you like. If using stamps then stamp the wording before adhering the piece to the step in case you have an error. If you know how to emboss you can also emboss the words [but as this blog is for kids projects, we don't do embossing as it is too complicated at this point in our life].

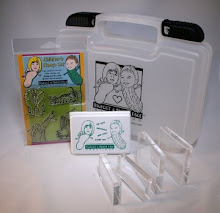
Here we used the stamps from our Bigfoot & Pickle Face line ~ SKU#CRC01 which is also located in our starter kit SKU#KITCRC01. Start to decorate, use your imagination. I used paper from a prior painting project and incorporated it into the cards.


Last step is to place your message ~ and this you can do on the back of the card. I put a separate piece of paper on the back to write our note. The majority of the paper I used was from scraps, so whenever you do a project -- keep those scraps. The images were stamped with our child safe/washable ink pad in black and then colored with washable markers, crayons and pencils. Everything we do is washable.

This card will fit in a 3-1/2" x 5" envelop ~ as long as you don't make your back image too high.

As I am behind in providing you with some crafty ideas, I will attempt to get another project up on this blog this week.

To find out more about us, visit our website at http://www.bigfootandpicklefacecreations.com and to shop go to our storefront at http://stores.bigfootandpickleface.com/StoreFront.bok

Monday, June 8, 2009

Mini Box decorated with Cow rubber stamp

Here is a cute little mini box that was decorated with a clear rubber stamp from our Farm Friends Clear stamp set 2 --SKU#FRM02. You can also purchase this stamp set which is included in the Farm Friends starter kit ~ this is a great deal for starting out your rubber stamp set. We filled the box with edible crayons and gave away as a welcome gift to the new neighbor.

Stamp your image onto white paper [we used card stock], color with washable markers, crayons or colored pencils. Here we used the clear rubber stamp from our farm set and used the black child safe/washable ink pad. Cut out when you are done and set aside.
Print templates below [READ #3 if printing template]. If you want to have no lines and will cut with your paper cutter and scorer, then you will follow the below instructions:
1. Cut 2 square pieces of paper (large is for the bottom, small is the lid). (1) 7"x7" and (1) 5"x5".
2. Score the 7"x7" square 1-3/4" around all four sides.
3. IMPORTANT: Score the 5"x5" square a little bit less than 3/4" from each edge. It will be about 1/16" less so that the lid will be slightly larger then the bottom so it will fit just right. If you do it at 3/4" your lid will not fit. DO NOT SCORE AT OR MORE THEN 3/4". ON THE TEMPLATE ~ you must score it before the dashed line. The dashed line is at 3/4"...so score just before the dashed line.

4. Cut your corners. On the lid [5"x5"] make sure you cut on the score line not on solid.

5. Fold on the scored edges, fold in your flaps and either glue or double stick tape them down. Flaps will go on the inside of the box.

6. Decorate your box and fill. Here we used leftover paper from both the top and bottom of the box to create a circle and used foam tape under the yellow circle and cow to bring it up. We used card stock paper in yellow for the top and decorative card stock paper for the bottom.
Remember to have fun and use your imagination. These boxes are easy to make and great for party favors. Remember to shop at our online store for all your kids craft supplies when it comes to rubber stamping. http://stores.bigfootandpickleface.com/StoreFront.bok
20% off for first 20 customers ~ use code BLOG20. Comments and suggestions are welcomed!

Thursday, June 4, 2009

Tattoo Body Markers

New product added to our storefront. Washable~Temporary body tattoo markers. They come in a pack of 6 fun colors: blue, orange, black, green, pink and violet. Like all of our products these are made in the USA.

Here we stamped an image from our clear rubber stamp fish set on to the skin with our child safe/washable ink pad and then colored in with our tattoo markers. Roll the image on to the skin so it does not smear.
These markers are gentle on the skin and washes out easily. Use these tattoo markers at your next party! Have fun, and remember to use your imagination.

Don't forget, we are running 20% off for the first 20 orders ~ use code BLOG20 during checkout.

Wednesday, June 3, 2009

Making Mini Bags and Decorating with Rubber Stamps

These are cute mini bags that are easy to make and can hold a gift card, some chocolates and even a small bag of gummy bears. Very fun project and perfect for party favors for children's party, showers or weddings ~ just decorate appropriately.

With this project we stamped onto white card stock our clear rubber stamp set Fish set 5 - SKU# FSH05 with our black child safe/washable dye ink pad. Then we colored with washable markers and washable colored pencils. Cut out the images and set them aside.
Download the template [email blog@bigfootandpicklefacecreations.com and I can send it to you as a pdf if you are having an issue with the jpg image, make sure that the end result of the image is 4 ¼” x 7 ½”. For those of you who don't want to have the lines shown on the inside of the bag, here are the dimensions to use with your paper cutter:
*Bag: Cut paper 4 ¼” x 7 ½”
*Score in landscape position at: 2 ½”, 3”, 3 ½”, 6”, 6 ½” and 7”. Turn the paper and score 1” for the bottom flaps. Do all your scoring first before cutting the “V” at the bottom.
*Handle: Cut 2 pieces ¼” x 3”

You should be able to get 2 bags out of a piece of paper, by printing it once and then returning the paper to the printer and printing it again. We just used regular stock colored paper for this project. If you have paper with a pattern on both sides for a more fancier look, that will work very nice too. Cut the outside of the image first [4 ¼” x 7 ½”]. Then score along the dashed lines. [If you don't have a scorer, then folding will work fine]. Fold along the score lines, see green image below ~ fold inward like a little mountain so there is a "v". Then cut out 3 "triangles" ~ dotted lines and a little wedge on the end. You will be cutting up to the 1" score on the bottom. Cut our your handles. When cutting, cut inside the black line so that there is not print lines on the handles.

Glue or use double sided tape to make the first part of your bag [yellow bag below]. The green bag is how it will look. Then turn it over and fold in the small flaps on the bottom and then glue or double side tape the longer sides of the bottom [see orange bag below]. Then fold your handles and glue to your bag. The handles will go on the inside of your bag.


Now, have fun and decorate your bag. You can decorate your bag prior to gluing or taping it all together. When done, put in your gift card or party favors.
Stamping can be fun, just use your imagination! If you have any questions or comments feel free to post, otherwise you can email me at the above address.