These are cute mini bags that are easy to make and can hold a gift card, some chocolates and even a small bag of gummy bears. Very fun project and perfect for party favors for
children's party, showers or weddings ~ just decorate appropriately.
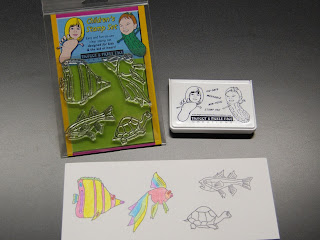
 With this project we stamped onto white card stock our clear rubber stamp set Fish set 5 - SKU# FSH05 with our black child safe/washable dye ink pad. Then we colored with washable markers and washable colored pencils. Cut out the images and set them aside.
 Download the template [email blog@bigfootandpicklefacecreations.com and I can send it to you as a pdf if you are having an issue with the jpg image, make sure that the end result of the image is 4 ¼” x 7 ½”. For those of you who don't want to have the lines shown on the inside of the bag, here are the dimensions to use with your paper cutter:
*Bag: Cut paper 4 ¼” x 7 ½”
*Score in landscape position at: 2 ½”, 3”, 3 ½”, 6”, 6 ½” and 7”. Turn the paper and score 1” for the bottom flaps. Do all your scoring first before cutting the “V” at the bottom.
*Handle: Cut 2 pieces ¼” x 3”

You should be able to get 2 bags out of a piece of paper, by printing it once and then returning the paper to the printer and printing it again. We just used regular stock colored paper for this project. If you have paper with a pattern on both sides for a more fancier look, that will work very nice too. Cut the outside of the image first [4 ¼” x 7 ½”]. Then score along the dashed lines. [If you don't have a scorer, then folding will work fine]. Fold along the score lines, see green image below ~ fold inward like a little mountain so there is a "v". Then cut out 3 "triangles" ~ dotted lines and a little wedge on the end. You will be cutting up to the 1" score on the bottom. Cut our your handles. When cutting, cut inside the black line so that there is not print lines on the handles.

Glue or use double sided tape to make the first part of your bag [yellow bag below]. The green bag is how it will look. Then turn it over and fold in the small flaps on the bottom and then glue or double side tape the longer sides of the bottom [see orange bag below]. Then fold your handles and glue to your bag. The handles will go on the inside of your bag.

Now, have fun and decorate your bag. You can decorate your bag prior to
gluing or taping it all together. When done, put in your gift card or party favors.

Stamping can be fun, just use your imagination! If you have any questions or comments feel free to post, otherwise you can email me at the above address.


 Glue or use double sided tape to make the first part of your bag [yellow bag below]. The green bag is how it will look. Then turn it over and fold in the small flaps on the bottom and then glue or double side tape the longer sides of the bottom [see orange bag below]. Then fold your handles and glue to your bag. The handles will go on the inside of your bag.
 Now, have fun and decorate your bag. You can decorate your bag prior to gluing or taping it all together. When done, put in your gift card or party favors.
 Stamping can be fun, just use your imagination! If you have any questions or comments feel free to post, otherwise you can email me at the above address.


No comments:
Post a Comment