Saturday, July 25, 2009

Bookmark fun with clear rubber stamps

It is always fun to stamp around with your clear rubber stamps. Well all that stamping can create a very nice project, why not make it useful. Today we are looking at making a simple bookmark using the clear rubber stamps. Bookmarks are great for gifts to give to grandparents, parents, aunts and uncles or make one for yourself. This project will encourage your child to read and use their bookmark!
Cut 2 pieces of paper in card stock. One size 2-1/2" x 8-1/2" and the other slightly smaller at 1-3/4" x 6". You can modify the size and shapes anyway you like. Here I cut blue card stock as the larger piece and used white card stock as my smaller piece.


I rounded the corners of the paper ~ I have a corner punch that you can purchase at any craft store or you can leave the corners the way they are. I then stamped my image on the blue stock with "VersaMark" Watermark stamp pad that I bought at the local craft store. This type of stamp pad gives a watermark look on plain colored paper and does not make it so plain looking; great for a nice background look. It is noted on the back of the stamp pad that it is child-safe. I then stamped my next image on the clear white paper with a black ink stamp pad.

Lastly, I finished the look by adding some color by coloring the stamped images and putting the two pieces of paper together with double sided sticky tape. Here I added some ribbon and some brads to complete the look. Use your imagination and work with your child to allow their creativity to flow.

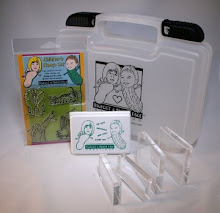
The images I used in this project were from the Bigfoot & Pickle Face Creations Farm collection Farm set 1 SKU#FRM01. I used our child safe/washable stamp ink pad in black. Purchase one of our starter kits, it comes in 3 different fun themes, they make a great gift too.

Visit our store to purchase this and other sets and our website to find out more about us. Stamping is fun, so do some today! Happy stamping!

Thursday, July 23, 2009

Square Fold Homemade Card with Paper clip bookmark

Here is a fun card to make and is big enough on the inside to fit a gift card. You can change your dimensions depending on the size you want to end up with, in my example the card measures 4" x 4". I used the clear rubber stamps from our circus set in the example below and the result is a real adorable card.

Cut your paper into a 8" x 8" square. I used card stock, but you can use regular paper it just won't be as thick. Always do a sample card before using your good paper for your final project, so you know what works best for you. Keep the scraps of your paper because if you do not use them in this project you will in another.

Fold the paper inward as shown below. I scored the paper at 2" on both side to make it easier to fold. You end up with a "gate".

Next turn the paper around and fold the other 2 sides. I once again scored it at 2" to make it easier to fold. You can use a "bone" folder, which is a tool that looks a bit like a letter opener to make your edges nice and sharp. If using regular paper, be careful if you are using a scorer. Press lightly as to not rip your paper if scoring. Be creative and use decorative paper to liven up your card.

After your folding you are pretty much done with the "card". Now it is time to decorate. The tag size is 2-1/2" x 3". If you change the size of your card to 6" x 6" then do your tag smaller at 2 x 2-1/2". I took a pencil and wrote a straight line on the back of it and marked where I wanted to put my hole punches. I punched out the hole and then clipped it with a scissor from the top down to the hole to make it look like it was taken out of a notebook. Fluff up the edges of the tag so it looks like it did indeed come out of a notebook. You can erase the pencil if you want as you will place that towards the back of the card, but you will see the back when you open the card.

Decorate the tag with your saying and any other embellishments. I did modify the tag below after I put the clip on it as there was too much white space and felt it needed more. After decorating the tag, use double sided tape to put it onto the card. The flaps will open downward so put it only on the bottom flap.

Time to do your paper clip. Here I stamped the image on a piece of scrap white card stock [left side] and colored it in. Then cut a piece of white card stock for the inside of the card at 3-3/4" x 3-3/4" [right side]. If using a 6" x 6" then cut your size smaller to 3" x 3" or less. Here I stamped the same image to the inside of the card. I used from our Bigfoot & Pickle Face Creations line the child safe/washable ink pad in both black and green. The cute seal is from our Circus Set 3 SKU#CRC03.

Cut out the image you stamped and colored, and cut out 2 pieces of card stock [square or circle]. You will also need a big paperclip.

Use double sided sticky tape and stick the 2 pieces of card stock together on the paper clip. Make sure you put it on the bigger end of the paperclip.

Then put double sided sticky tape to the stamped image and adhere it to the card stock on the paperclip. See below for the example.

Use double sided sticky tape to put your white card stock to the inside of the card.

You are done! You can use these homemade cards for any occasion. The fish on the below card is from our Fun with Fish collection SKU#FSH02 - Fish Set 2.

Rubber stamping is so much fun so continue to visit us for more ideas. Send us your ideas or make a comment, it is always appreciated. Kids have lots of fun creating their own cards, so include them in your project and you will be amazed at what they can create. Visit our store to purchase your starter kit if you don't have one already!

Friday, July 17, 2009

Clear Rubber Stamps - Starter Kits - 2009 Preferred Choice Awards

A few months back I submitted the Clear Rubber Stamps Starter Kits in all three themes, Circus Act!, Farm Friends and Fun with Fish for the 2009 Creative Child Awards Program which consists of 100 Moms and Educators reviewing submissions.

Here at Bigfoot & Pickle Face Creations we are pleased to announce that all three clear rubber stamp starter kits were awarded the 2009 Preferred Choice Award in the "Creative Craft" Category. We are proud to receive the award and happy to say all our products are made in the USA.


Thank you to everyone for visiting Bigfoot & Pickle Faces website, blog and storefront and for purchasing our product.

Circus Act!


Fun with Fish


Farm Friends

Visit our storefront to purchase your kit for a birthday gift, holiday gift or to have fun for the whole family!

Next week we will be featuring some more fun and easy projects; feel free to give suggestions on what you would like to see or comment on something you like.

Wednesday, July 15, 2009

Hint about buying Clear Rubber Stamps

The other day I decided to purchase a set of clear rubber stamps in the alphabet so that I could use them in my kid's craft projects versus printing the sayings off the computer. Since we currently do not carry the alphabet in our clear rubber stamp line here at Bigfoot & Pickle Face Creations, I purchased a small set for $1.49 at the local craft store. It is a small font and kid-like so I though it would work perfect with the card designs.

Much to my dismay, when I went to adhere the clear stamp to the acrylic block [new out of the packaging], it just fell off the block. There was no "stick" left to hold it on to the block. I looked on the package and noticed it was NOT made in the USA. Needless to say, I had a very hard time keeping them on the block and when I went to stamp the image it was not clear at all ~ you could not understand the word.

So a quick note that when you are ready to purchase some clear rubber stamps, buy quality clear rubber stamps. Purchasing the clear stamps is really nice because you can see where you are stamping which is great for kids, yet make sure it is made in the USA as you will get a much better quality stamp then those made outside the USA.

I am terrible at cleaning my clear rubber stamps at Bigfoot & Pickle Face Creations, but every time I get a great image and it sticks wonderfully to the acrylic block with no slipping or falling off. Purchasing quality stamps at a higher price will benefit you in the long run, not only will they perform but with proper care they will be around a long time.

Visit our store to see all our products made in the USA. Thanks for visiting us and feel free to leave a comment.

Thursday, July 9, 2009

Spinner Card Instructions

Spinner cards are very easy to make and lots of fun to give. This card is simple to make with your child and they will have the ability to use their creative side. There are many ways to do this card as you can see in the end result. Use your imagination and you will be amazed at what you will create. You will probably need additional postage due to the weight and thickness of the card.

The end result of your card will be 4-1/4" x 5", as I was able to create 2 cards from one piece of card stock.

In the instructions I used from our Bigfoot & Pickle Face Creations line the snail SKU# FSH04 clear rubber stamps and the child safe/washable ink pad in black. This will match the envelope I did the day before.

Cut a piece of card stock paper 4-1/4" x 10". You should be able to get 2 cards out of an 8-1/2" x 11" paper. Score in landscape at 5", and fold in half. Out of another coordinating card stock cut one piece to 4-1/4" x 5".

Print out the template below, it looks like a long oval. This is the shape you will want to use for your spinner part of your card. There are many ways to create this shape. I printed mine on card stock and then re-enforced it with tape on the back so I can use over and over again. I created it in Word by drawing some lines at 3-1/4" and then putting some round lines on the end. The width of the shape is about 5/8" or less; it should not be any wider then that, as a penny "sandwich" needs to fit in the groove and should not fall out. If it is larger then that the penny will not sit in properly, so it is better to have it smaller.

Another way to make the end holes is to draw your lines on your paper and then use a 1/2" hole punch on either end and then cut along your lines. When I get a hole punch I will demonstrate in a different blog.
With my template, I trace it with a pencil onto the back of my 4-1/4" x 5" card stock paper and I used a straight edge ruler and a exacto knife and cut out my shape. You will need to assist your child with this process as it will involve sharp instruments.


Next you will need to either use Foam tape or cardboard as demonstrated on my "green" paper, to raise up the image to allow for the pennies to rotate. I used double sided tape to adhere my cardboard to the green paper. Next make a "sandwich" out of your 2 pennies by putting a round piece of double-sided foam tape between them-the foam tape should just be a bit smaller then the penny [if it is too small your penny will fall out of the track. You can find this item at your local craft store. You should be able to insert your penny sandwich in the slot and it should move freely back and forth.

Use double sided tape to adhere the facing of your card to your main card [in my example, the green to the orange]. I taped onto the cardboard double sided tape and stuck it to my main card. Lastly, decorate your card.


NOTE: you can and probably should decorate your card BEFORE you put it all together. At that time you can think of what you want to put as an image on your spinner and that what sayings you want to use. To make the instructions simple, I decorated the card after putting it all together so you can understand the simplicity of it.

I printout out my sayings and cut them out and used double-sided tape to place where I wanted them, but you can use clear rubber stamps and stamp directly to the card. Make sure your image you are going to place on the penny sandwich is larger then the penny, as you don't want the penny to show. If you like a certain image and it is too small, you can always layer the image to a larger piece of coordinating paper. On the inside of the card, cut a piece of white card stock 3-1/2" x 4" to write your message. Here are a couple additional cards that I did.

Have fun with this project, as your imagination is your only limitation. Kids love to do this card when they are doing their kids crafts, so work with them on their homemade cards and you will be amazed at what they can create. With the above cards, I made my own flowers out of scrap card stock and used a brad to hold it all together. I used stamp sets from our Bigfoot & Pickle Face Creations Collection, which made for lots of fun designing. If you have any questions, feel free to comment or email me. If you have a spinner card you want to share, email me or add your link.

Wednesday, July 8, 2009

How to make an Envelope

Since I have posted some instructions on making homemade cards, it seemed fitting to have instructions on how to make an envelope. It is very simple to do an envelope, you can either take apart an envelope design you like and trace it, or you can print out the following template. To save and print the template below, right click and save to your computer and then print.


Print the template on card stock paper. Cut along the solid lines and score along dotted lines.

Fold your envelope and glue along the side, or your can use double sided tape. Do a practice envelope so you know where to glue. I know it is a bit hard to see with the bright pink paper, but I am sure you can get an idea on what I am talking about.

Decorate your envelope, here I used clear rubber stamp with a cute snail from SKU# FSH04 and child safe/washable ink pad black. Put in your card and you are ready to mail!

These envelopes are real easy for kids to cut out and fold and have fun decorating. Use our clear rubber stamps as they are fun and easy to use and clean. Take a plain envelope and jazz it up with Bigfoot & Pickle Face's clear rubber stamp line. Stamping is a great way to spend time with your kids and they can create some wonderful artwork.