 Cut your paper into a 8" x 8" square. I used card stock, but you can use regular paper it just won't be as thick. Always do a sample card before using your good paper for your final project, so you know what works best for you. Keep the scraps of your paper because if you do not use them in this project you will in another.
 Fold the paper inward as shown below. I scored the paper at 2" on both side to make it easier to fold. You end up with a "gate".
 Next turn the paper around and fold the other 2 sides. I once again scored it at 2" to make it easier to fold. You can use a "bone" folder, which is a tool that looks a bit like a letter opener to make your edges nice and sharp. If using regular paper, be careful if you are using a scorer. Press lightly as to not rip your paper if scoring. Be creative and use decorative paper to liven up your card.
 After your folding you are pretty much done with the "card". Now it is time to decorate. The tag size is 2-1/2" x 3". If you change the size of your card to 6" x 6" then do your tag smaller at 2 x 2-1/2". I took a pencil and wrote a straight line on the back of it and marked where I wanted to put my hole punches. I punched out the hole and then clipped it with a scissor from the top down to the hole to make it look like it was taken out of a notebook. Fluff up the edges of the tag so it looks like it did indeed come out of a notebook. You can erase the pencil if you want as you will place that towards the back of the card, but you will see the back when you open the card.
  Decorate the tag with your saying and any other embellishments. I did modify the tag below after I put the clip on it as there was too much white space and felt it needed more. After decorating the tag, use double sided tape to put it onto the card. The flaps will open downward so put it only on the bottom flap.
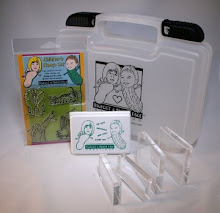
  Time to do your paper clip. Here I stamped the image on a piece of scrap white card stock [left side] and colored it in. Then cut a piece of white card stock for the inside of the card at 3-3/4" x 3-3/4" [right side]. If using a 6" x 6" then cut your size smaller to 3" x 3" or less. Here I stamped the same image to the inside of the card. I used from our Bigfoot & Pickle Face Creations line the child safe/washable ink pad in both black and green. The cute seal is from our Circus Set 3 SKU#CRC03.
 Cut out the image you stamped and colored, and cut out 2 pieces of card stock [square or circle]. You will also need a big paperclip.
 Use double sided sticky tape and stick the 2 pieces of card stock together on the paper clip. Make sure you put it on the bigger end of the paperclip.
 Then put double sided sticky tape to the stamped image and adhere it to the card stock on the paperclip. See below for the example.
 Use double sided sticky tape to put your white card stock to the inside of the card.
 You are done! You can use these homemade cards for any occasion. The fish on the below card is from our Fun with Fish collection SKU#FSH02 - Fish Set 2.
Rubber stamping is so much fun so continue to visit us for more ideas. Send us your ideas or make a comment, it is always appreciated. Kids have lots of fun creating their own cards, so include them in your project and you will be amazed at what they can create. Visit our store to purchase your starter kit if you don't have one already!


Great tutorial!!! i like this one its useful for clear card designer..
ReplyDeletePlastic Business Cards
Plastic Card printing
Plastic Business Cards